Meteor 教程
![]()
Build apps that are a delight to use, faster than you ever thought possible
##Meteor 是什么? Meteor 是一个构建在 Node.js 之上的平台,用javascript开发web 和mobile apps。完全开源。
##它的快体现在哪里? ###对用户:实时响应,无需等待
- 客户端路由 Iron.Router
- 延迟补偿(Latency Compensation)
###对开发者:缩短开发时间
- Radically less code : reactive programming model
- One language everywhere : javascript
- Unified package system(browser,server,mobile)
- Hot deploys : meteor up
- Database Everywhere
##快速开始 Tutorial
##packages Meteor 所有的功能都以包的形式实现。核心包、第三方包。
meteor list
meteor add package-name
meteor remove package-name
当你添加或者删除包得时候,程序会自动重启。包的依赖记录在.meteor/packages。
可以通过meteor search 查找包。也可以通过官方包服务器atmospherejs
通过meteor show package-name查看包信息。
包名里带:的,说明它由个人或组织维护。不带:,说明是官方维护的,作为Meteor框架的一部分。
常用包:
- coffeescipt
- accounts-ui
- iron:router
##文件结构 一个Meteor App会包含客户端javascript(运行在浏览器或PhoneGap mobile app),服务端javascript(运行在Node.js),HTML template,CSS,静态文件。
###默认文件加载
Meteor 会自动加载所有文件,所以无需再用<script>和<link>来引用外部脚本文件和样式文件。
如果一个javascript文件不在下面的特殊文件中,那么它会被发送到客户端和服务端。
###特殊文件夹
- client 只在客户端使用,用于放置HTML、CSS和UI相关的javascript。
- server 只在服务端使用,不会被发送到客户端。用于放置敏感的逻辑和数据,客户端不可见。Meteor收集除了client、public、private文件夹中的所有js文件,然后把它们加载到node.js server实例中。
- public(top-level) 放置图片、字体等资源文件。
- private(top-level) 只能在服务端通过Assets API 获取
- tests
- client/compatibility
###文件加载顺序
- HTML 模板文件总是最先加载
- 以
main.开头的文件最后加载 lib/文件夹里的优先加载- 目录层次更深的优先加载
- 按照整个路径的字母顺序加载
例如:
nav.html
main.html
client/lib/methods.js
client/lib/styles.js
lib/feature/styles.js
lib/collections.js
client/feature-y.js
feature-x.js
client/main.js
##数据从哪来?—Collection Meteor把数据保存在collection里。collection里保存的javascript对象叫做document。
声明一个collection
new Mongo.Collection(name,[option])
注意:需要将将collection声明为全局变量,这样服务端和客户端才能用相同的API操作相同的collection。
声明了collection之后,就可以对其进行操作了
collection.findOne()
collection.find()
collection.insert()
collection.update()
collection.remove()
###安全性 默认情况下,新建的Meteor app里,客户端是可以直接调用insert,update,remove 。这是因为为了简化开发,meteor create 的时候默认包含了一个insecure 包。
为了安全考虑,我们需要先移除insecure包,
meteor remove insecure
默认情况下,移除insecure之后,客户端所有的操作都会被拒绝。所以,我们需要添加一些allow规则:
// In a file loaded on the server (ignored on the client)
Posts.allow({
  insert: function (userId, post) {
    // can only create posts where you are the author
    return post.createdBy === userId;
  },
  remove: function (userId, post) {
    // can only delete your own posts
    return post.createdBy === userId;
  }
  // since there is no update field, all updates
  // are automatically denied
});
allow 方法可以接受三个回调函数,分别对应insert,remove,update。每个回调函数的第一个参数是登录用户的_id,其它的参数如下:
insert(userId, document)
update(userId, document, fieldNames, modifier)
remove(userId, document)
如果返回true,说明允许,否则拒绝。
deny 方法用来重写allow 规则。例如:
// In a file loaded on the server (ignored on the client)
Posts.deny({
  insert: function (userId, post) {
    // Don't allow posts with a certain title
    return post.title === "First!";
  }
});
注意:allow和deny规则只对客户端代码生效,对服务端和methods里的代码不起作用。
##数据展示到哪里?—模板 模板就是包含动态数据的HTML片段。可以通过javascript给模板插入数据和监听事件。
###定义模板 模板定义在.html文件中,可以放在任何文件夹,除了server,public,private。
每一个.html 文件中可以包含任意数量的顶级元素:<head>, <body>, <template>。例如:
<!-- add code to the <head> of the page -->
<head>
  <title>My website!</title>
</head>

<!-- add code to the <body> of the page -->
<body>
  <h1>Hello!</h1>

</body>

<!-- define a template called welcomePage -->
<template name="welcomePage">
  <p>Welcome to my website!</p>
</template>
Meteor 通过Spacebars 给HTML添加功能。例如:可以通过来插入模板,通过` `来显示数据,以及逻辑控制标签,``
###给模板定义数据 模板的数据有一部分来自controller(后面再说),还有一部分来自helper。 helper 可以是简单的一个值,也可以是个函数,还可以带参数。
Template.myTemplate.helpers(helpers)
例如:
Template.nametag.helpers({
  name: "Ben Bitdiddle"
});
然后就可以在模板里显示:
<template name="nametag">
  <p>My name is .</p>
</template>
上面的方法是给特定模板添加helper,可以通过Template.registerHelper来注册一个所有模板都可以获取的helper。
###监听模板事件
Template.myTemplate.events(eventMap)
假设有下面的模板:
<template name="example">

    <button class="my-button">My button</button>
    <form>
      <input type="text" name="myInput" />
      <input type="submit" value="Submit Form" />
    </form>

</template>
给模板注册两个事件:
Template.example.events({
  "click .my-button": function (event, template) {
    alert("My button was clicked!");
  },
  "submit form": function (event, template) {
    var inputValue = event.target.myInput.value;
    var helperValue = this;
    alert(inputValue, helperValue);
  }
});
事件描述符作为key,事件处理函数作为value。事件处理函数会收到两个参数,一个是事件对象,一个是当前模板实例。事件处理函数还可以通过this 获取当前的数据上下文(相当于template.data)。
key的前半部分(空格之前)是要捕获的事件名称。几乎支持所有的DOM事件。常见的有:click, mousedown, mouseup, mouseenter, mouseleave, keydown, keyup, keypress, focus, blur, 和 change。
key的后半部分是CSS选择器,指明要监听的元素。几乎支持所有jQuery选择器。
###onRendered
Template.myTemplate.onRendered(callback)
类似于jQuery里的
$(document).ready(callback)
###模板实例 模板实例可以用来获取模板中的HTML元素,还可以给模板实例添加属性,用于在reactive update之间保持数据。
模板实例可以通过下面方式获取:
onCreated,onRendered,onDestroyed回调函数里this的值- 事件处理函数的第二个参数
- 在helper里通过
Template.instance()
模板实例有很多方法和属性,例如,选取DOM元素:
template.findAll(selector)
template.find(selector)
//还可以用
template.$()
获取数据上下文
tempalte.data
##数据如何到达模板?—发布和订阅

Database everywhere。简单地说,Meteor会把服务端的一部分数据复制到客户端。
这样做的结果:
- 服务器不再发送 HTML 代码到客户端,而是发送真实的原始数据,让客户端决定如何渲染数据。
- 用户不必等待服务器传回数据,而是立即访问甚至修改数据(延迟补偿 latency compensation)
新创建的Meteor App 都会包含一个autopublish的包,它会自动的把所有的documents发布到每一个连接上的客户端。
出于安全性等考虑,我们不能把服务端数据全部都推到客户端。通过Meteor的发布功能来精确控制哪些数据子集是要推送的。
首先移除autopublish包
meteor remove autopublish
假设数据库中存了一些文章,如下:
其中,有一些文章是有特殊标记的,不允许客户端看到:
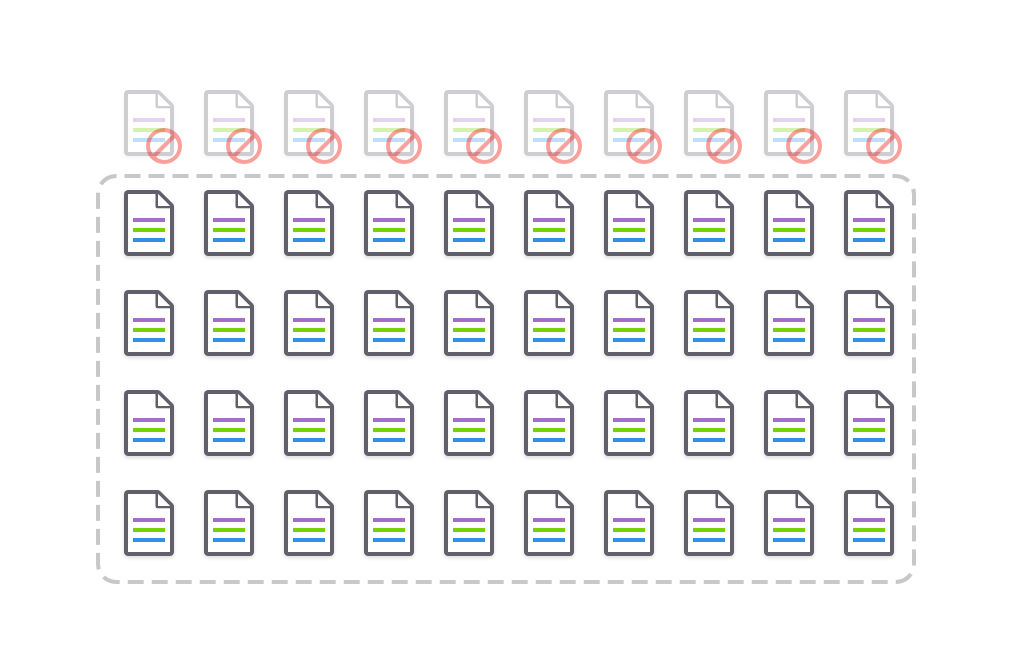
在服务端,就可以这样写:
Meteor.publish('posts', function() {
  return Posts.find({flagged: false});
});
在客户端订阅:
Meteor.subscribe('posts');
更进一步,假设我们正在浏览Bob Smith的个人主页,这里只显示它自己的文章:
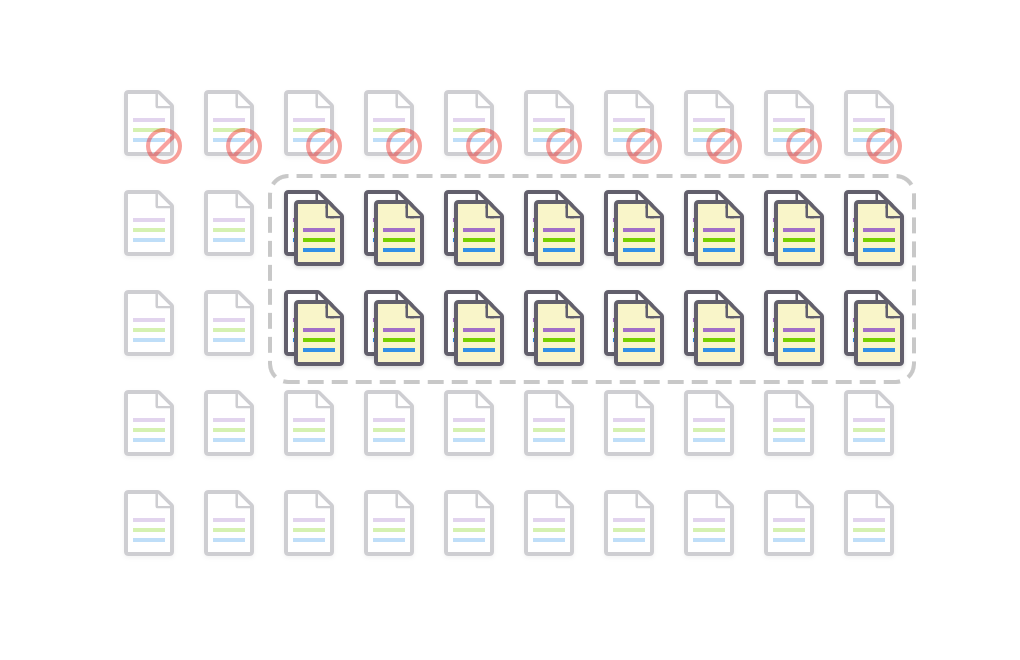
修改发布:
Meteor.publish('posts', function(author) {
  return Posts.find({flagged: false, author: author});
});
修改订阅:
Meteor.subscribe('posts', 'bob-smith');
订阅之后,在客户端就可以查询数据了,例如:
posts=Posts.find();
###参考资源